What Is Uncheckit?
Uncheckit is deemed as Adware-type software or potentially unwanted program (PUP) which will never give any advantage to you when it shows up on your PC without permission. On the converse, it will make you inconvenience with a considerable number of ads. To be sure, even thought it promises you that these commercials are extraordinary and will help you cut the price in the online shopping. However, all of them are fake and misleading. Thus, we believe you should keep yourself away from this PUP and protect your PC from being insulted with these ads.

ads by Uncheckit
If Uncheckit turns out to infect your PC, it will recommend you to use it for better discounts and it will guarantee you with different coupons and price reduction. It ensured this with the objective that you could believe it and keep it on your PC. Gradually, when you open these ads or links it gives, you will uncover that you are cheated to open the websites and they are very different from what it asserted to be. And after that, you cannot reach any of your destinations. Instead, you would go to get many adware inside, such as freeware, shareware, program robber, or infection. So this is the true face of Uncheckit .
After knowing the truth, many users will make up their minds to get rid of Uncheckit. But it has already set out to stop this programming beforehand. To avoid this, we have created a series guides for you. So please check up here.
Summary on Uncheckit |
|
| Infection Type | Adware |
| Similar Threats | PrimaScope, Costlybar extension, MySafeSavings |
| Attacking Targets | All Versions of Mac OS and Windows OS (Win XP/Vista/7/8/8.1/10) |
| Spreading Methods | Shared Free Programs, Spam Email Attachments, Spam Ads on Third Party Websites, Porn Website Links, Torrent |
| How Victims Called Uncheckit | Uncheckit malware, Uncheckit adware, Uncheckit virus, ads by Uncheckit, Uncheckit ads, Uncheckit rogueware |
| Problems Caused by Uncheckit |
|
The Uncheckit removal instructions contain 2 parts – Part One is for Windows PC Users, Part Two is for Mac OS Users. Please read the corresponding removal instruction for your computer.
Part one (Windows OS) – Solutions for Uncheckit Virus Removal
We provide three solutions on Uncheckit removal. You can choose the one that you can fully understand and handle on your own. But we still have some suggestions here:
Solution A is complicated, if you have enough PC techniques and rich experience on PC repair, you can try Solution A first; If you are not so great on your PC repair, do not use Solution A, or you may incautiously cause many errors and corruptions.
Solution B and Solutions C are easy methods that everyone can understand and execute. We recommend most of PC users to use these two solutions.
Solution A – Uncheckit Manual Removal
Important Note – Manual removal will require users to delete malicious items in Registry, which is crucial to entire system and users cannot make any mistake. If you are not an computer expert with rich experience and good knowledge and skill on removing virus manually, please skip the manual steps, and scroll down to directly choose the Automatic Removal Steps in Solution B and Solution C.
Step 1. Change system folder settings to show all hidden files
On Windows 7 / Vista Computer
- Right-click the Windows Logo button and choose Open Windows Explorer.
- Click Organize and choose Folder and Search Options.
- Click the View tab, select Show hidden files and folders and then clear the checkbox for Hide protected system operating files.
- Click Yes on the warning and then click OK.
On Windows 8 Computer
- On your keyboard press the Windows + E keys.
- Click the View tab.
- Check File name extensions and Hidden items
Step 2. Seek and delete Uncheckit related files in hidden folders listed below:
(The files on your computer may appear with different name, if cannot find out the files listed below, do not delete any file, just use Solution B and Solution C)
%Temp%\[adware name]
%AppData%\[adware name]
%LocalAppData%\[adware name]
%LocalAppData%\[adware name].exe
%CommonAppData%\[adware name]
%AllUsersProfile%random.exe
Step 3. Seek and remove Uncheckit related registry files listed below:
1. Open Registry Editor first:
On Windows 7 / Vista Computer
- Click Start button
- Select Run button
- Type: regedit
- Click OK button
On Windows 8 Computer
- Press Win [Windows key] + R on your keyboard. This can be done either while at Windows 8 Start menu/Metro screen or on Windows 8 desktop
- At the dialog box that pops open, type regedit.exe and hit OK
- Once you hit OK, Windows UAC will prompt you to confirm you want to open Register Editor — hit “Yes”
2. Find out and remove all harmful registry files related with Uncheckit virus listed below:
(The registry files on your computer may appear with different name, if cannot find out the files listed below, do not delete any file, just use Solution B and Solution C)
HKEY_LOCAL_MACHINESOFTWAREsupWPM
HKEY_LOCAL_MACHINESYSTEMCurrentControlSetServicesWpm
HKEY_CURRENT_USERSoftwareMicrosoftInternet ExplorerMain “Default_Page_URL”
HKEY_LOCAL_Machine\Software\Classes\[adware name]
HKEY_CURRENT_USER\Software\Microsoft\Windows\CurrentVersion\Uninstall\[adware name]
Notes: Manual removal needs advanced PC skills, if you cannot find the Uncheckit files accurately, you may ruin your system for removing important system files. Therefore, if you are not a user with Advanced tech skills, it’s best to use Solution B or Solution C to solve your problem easily and safely.
Solution B – Uncheckit Easy Removal Method
Step 1. Uninstall Uncheckit related programs from your computer
On Windows 10 Computer
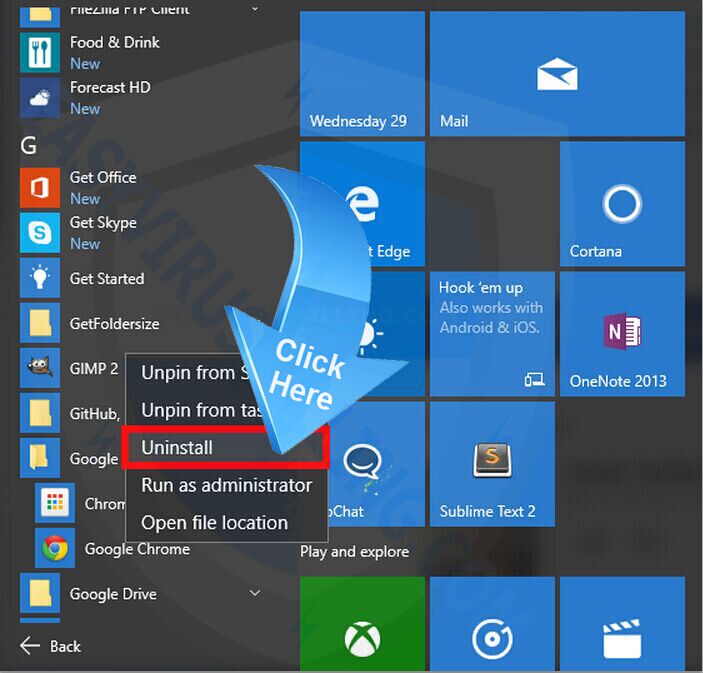
1. Click Start Menu on Win 10 screen, and click All apps.
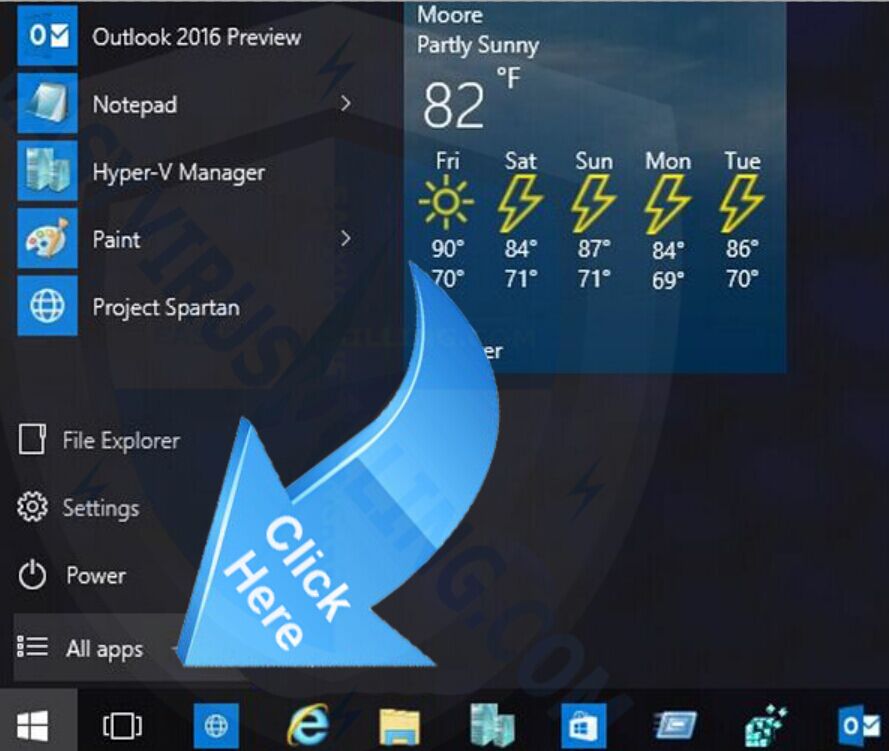
2. Now you can see all apps of your Win 10, find out the unwanted or suspicious program, then right-click it and select Uninstall.
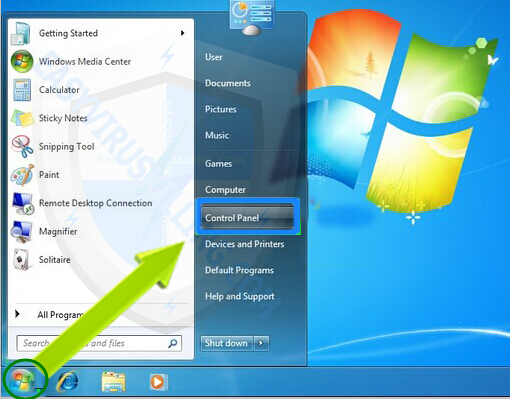
On Windows 7 / Vista Computer
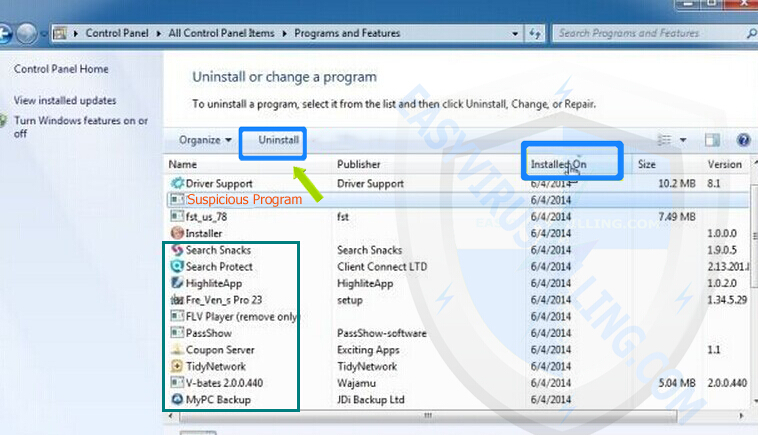
1. Click on the Start button to open your Start Menu, then Click Control Panel
2. In Control Panel, click on Uninstall a program under the Programs category
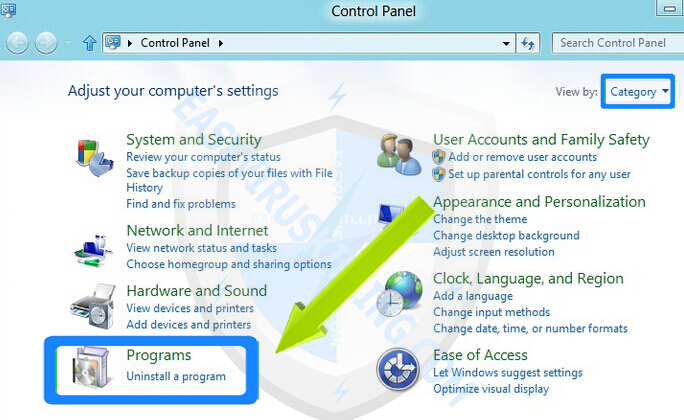
3. In the Programs and Features window, click Installed On to display the latest programs, scroll through the list to seek and uninstall Uncheckit and other unwanted and unfamiliar programs that look suspicious.
On Windows 8 Computer
1. Open the Settings Charm Bar by pressing Windows key  + I key on your keyboard at the same time, then click on the Control Panel option
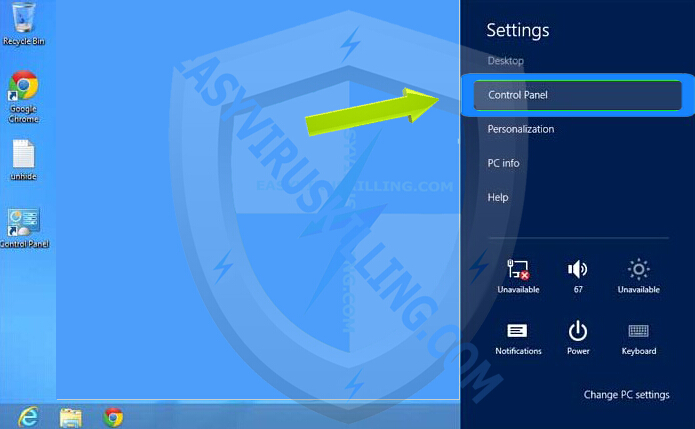
2. In category view, click on Uninstall a program under the Programs category
3. In the Programs and Features window, click Installed On to display the latest programs, scroll through the list to seek and uninstall Uncheckit and other unwanted and unfamiliar programs that look suspicious.
Step 2. Remove Uncheckit plug-in, toolbar, add-on, extension from Microsoft Edge/ Chrome/Firefox/IE
On Microsoft Edge
(Since Edge browser does not have extensions function now, what you need is just to reset homepage and search engine.)
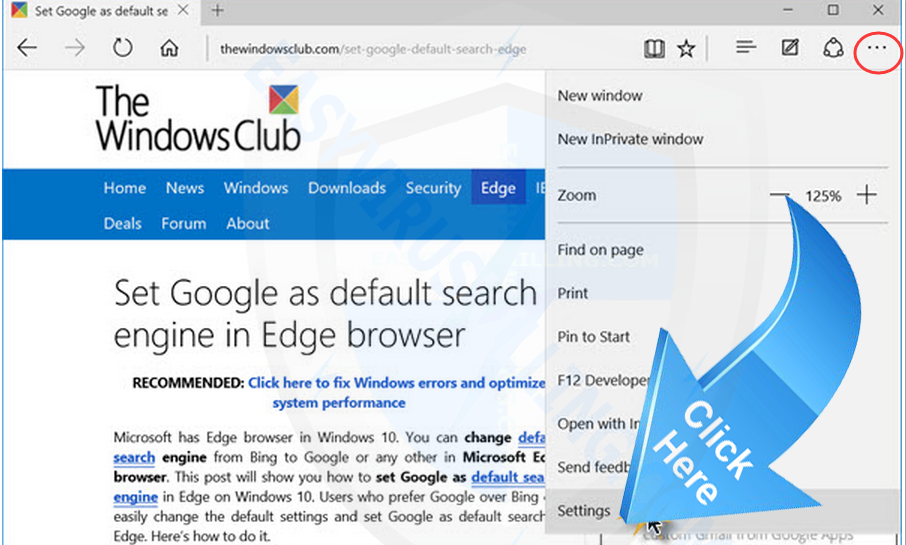
1. Set your homepage page on Microsoft Edge to remove hijacker virus.
- Select More (…) on the address bar, then Settings
- Under Open with, select A specific page or pages
- select Custom to enter the URL of page you want to set as homepage
———————————————————————————————————————————————-
2 . Set your default search engine to remove search redirect virus.
- Select More (…) on the address bar, then Settings
- Click View advanced settings
- Click <Add new> under “Search in the address bar with”, then input the search engine you like
- Now select the search engine you like and click Add as default
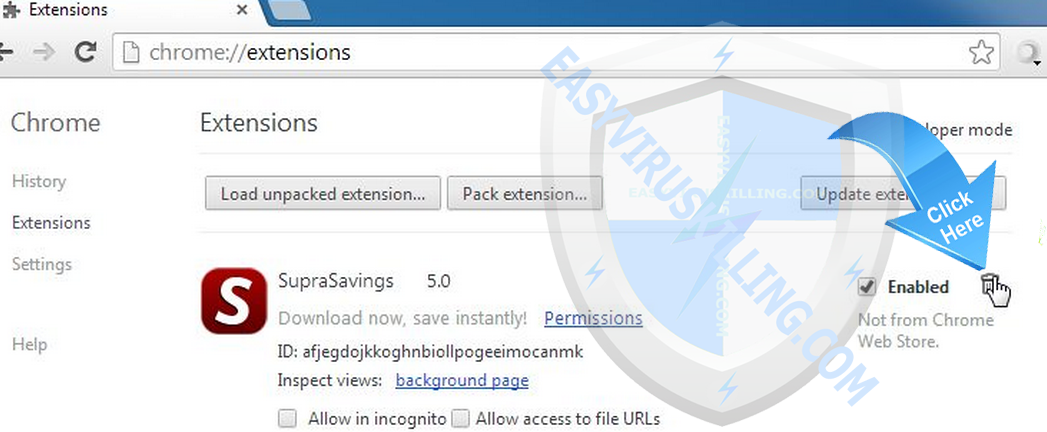
On Chrome
- Click the Chrome menu
 on the browser toolbar.
 - Click Tools.
- Select Extensions.
- Click the trash can icon
 to delete Uncheckit extension.
 - Make sure to remove all extensions you do not know or need.
- A confirmation dialog appears, click Remove.
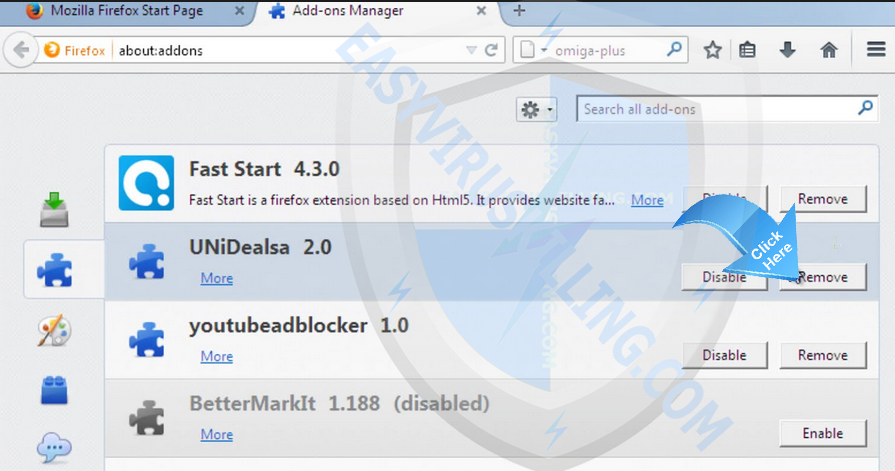
On Firefox
- Click the menu button
 and choose Add-ons. The Add-ons Manager tab will open.
 - In the Add-ons Manager tab, select the Extensions panel.
- Make sure to remove all extensions you do not know or need.
- Click Disable or Remove button of Uncheckit.
- Click Restart now if it pops up.
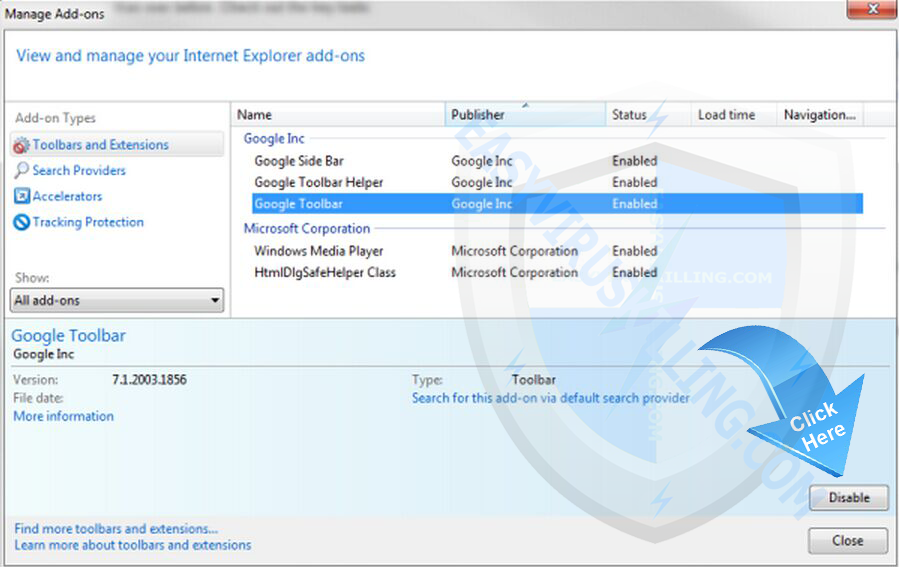
On Internet Explorer
- Open the IE, click the Tools button

, and then click Manage add-ons.
- Click Toolbars and Extensions on left side of the window., and then select Uncheckit
- Make sure to remove all BHO’s you do not know or need.
- If the add-on can be deleted, you’ll see the Remove option. Click Remove and then click Close. Otherwise click Disable button.
Step 3. Scan your computer with SpyHunter to remove Uncheckit infection (Important Step)
Uninstallation of program in Control Panel and removal of extensions / add-on from web browsers can help us remove parts of adware and malware, but nowadays most of computer threats such as Uncheckit are created with advanced technology and cannot be easily removed with regular methods, therefore we need to use top-class malware remover like SpyHunter to get rid of threats automatically. To completely remove Uncheckit, you should download and run SpyHunter antimalware to diagnose your computer and get rid of all threats related with the virus.
1. Click this link “Download SpyHunter“ or the blue button below to download SpyHunter Anti-Malware:

Tips: After SpyHunter is downloaded, your Chrome /Firefox /IE may display such fake security warning ” This type of file can harm your computer. Do you want to keep Download_Spyhunter-Installer.exe anyway?”, which is generated by virus to cheat you, please just ignore the fake warning and click “Keep” button.
(Notes – If you do not need it any more, please follow instructions on SpyHunter uninstall. SpyHunter`s free version provides unlimited free scans and detection. After it detects malicious files, processes and registry entries, you can follow the scan results to manually locate and remove them on your own; or to purchase its full version to automatically remove the virus with ease. Meanwhile, the full version of SpyHunter will offers you unlimited one-on-one professional help for any malware related issue by its official PC expert.)
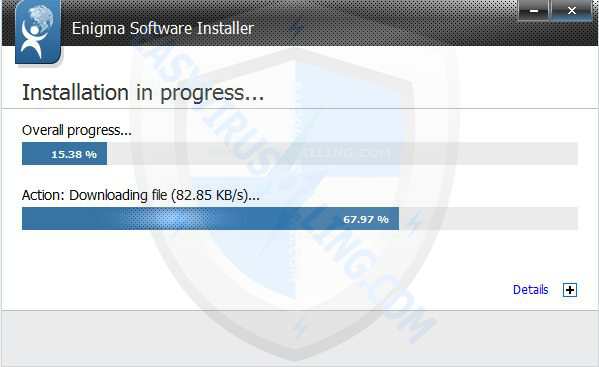
2. Once downloaded, please double-click SpyHunter-Installer.exe to start the installation of SpyHunter.
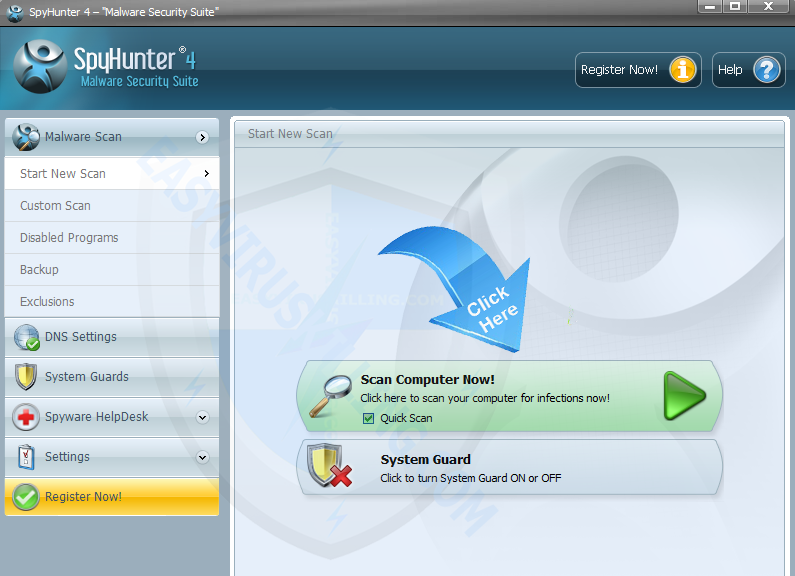
3. When SpyHunter is installed, it will be run automatically, then click Scan Computer Now to detect Uncheckit related threats:
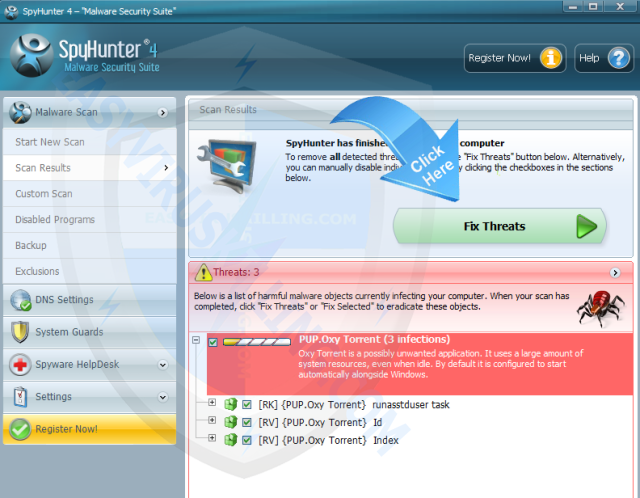
4. Once SpyHunter completes the scan, please click Fix Threats to get rid of Uncheckit.
Note: According to users investigation, this solution can help 95% users remove virus like Uncheckit completely. But if it does not function on your computer, you need to complete all steps listed in Solution C. Continue now:
Solution C – Uncheckit Quick Removal Guideline
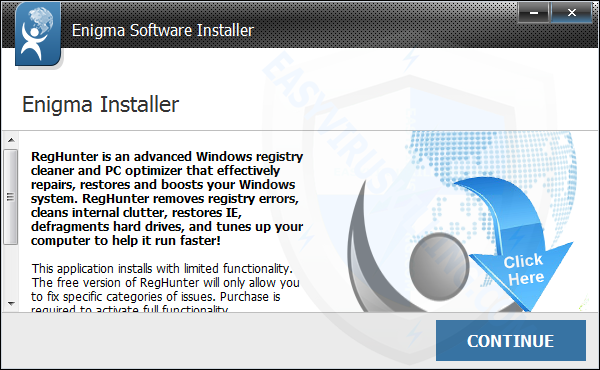
Step 1. Run RegHunter to detect security bugs and fix corrupted/modified system files used by Uncheckit for re-infiltration (Important Step)
If you tried Solution B and still unable to remove Uncheckit, then we are sure that some of your system files must been modified or damaged by the virus. With a deep investigation and test on stubborn malware such as Uncheckit, our tech team confirm that the security bugs and system files modified /corrupted by virus is the reason why the threats survive and reborn.
Most of spyware and malware infect Windows machines by making use of existed security bugs, and they alter or corrupt crucial system files with codes, that means malware like Uncheckit is able to execute installation or activation codes of its program repeatedly, no matter how many times you delete it from Control Panel or extensions. Therefore, if you do not detect and fix all security bugs and restore the corrupted / modified system files to default, Uncheckit can keep coming back. In such situation, it’s best to run RegHunter to fix security bugs and corrupted files, hindering the reborn and re-infiltration of Uncheckit.
1. Click this link “Download RegHunter” or the green button below to download RegHunter system optimizer:

Tips: After RegHunter is downloaded, your Chrome /Firefox /IE may display such fake security warning “This type of file can harm your computer. Do you want to keep Download_Reghunter-Installer.exe anyway?“, which is generated by virus to cheat you, please just ignore the fake warning and click “Keep” button.
Notes – If you do not need it any more, please follow instructions on RegHunter uninstall. RegHunter`s free version provides unlimited free scans and detection. After it detects corrupted registry files and system errors files, you can follow the scan results to manually replace them with healthy files copied from healthy PC on your own; or to purchase its full version to automatically fix the Registry and errors with ease. Meanwhile, the full version of RegHunter will offers you great features to optimize your system performance.)
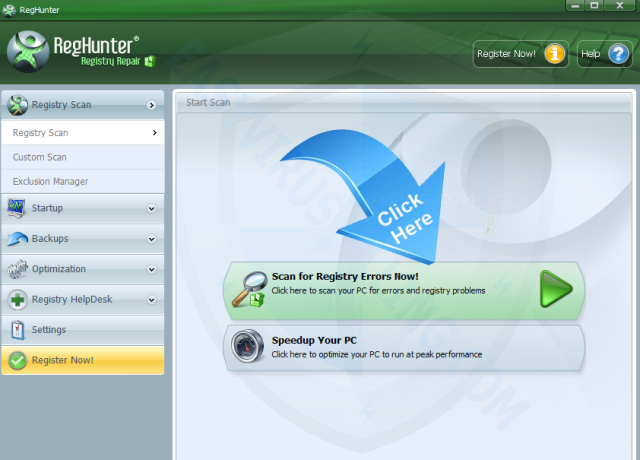
2. Once downloaded, then double-click RegHunter-Installer.exe to start the installation of RegHunter.
3. When RegHunter is installed, it will be run automatically, then click Scan for Registry Errors Now! to detect files corrupted by Uncheckit:
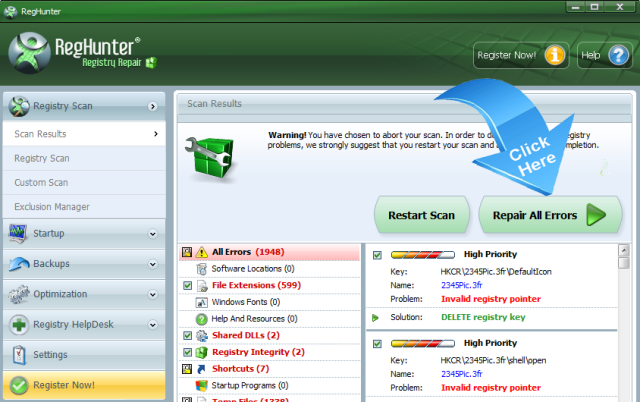
4. Once RegHunter completes the scan, please click Repair All Errors to solve security bugs related with Uncheckit.
Step 2. Download and install Avast Internet Security to re-scan threats and protect your PC For Free
Avast Internet Security provides 60 Days free trail for you, it’s highly recommended to download and install it to re-scan your system and secure everything in your machine. You can uninstall it when you do not need it any more, it is 100% free. Click the button below to Download Free Avast Internet Security and enjoy 60 days of premium protection for free.

Step 3. Reset Microsoft Edge, Chrome, Firefox and IE to remove Uncheckit
– Reset Microsoft Edge
(We have reset homepage and search engine at solution 2, so we just need to clear up the cookies on Microsoft Edge)
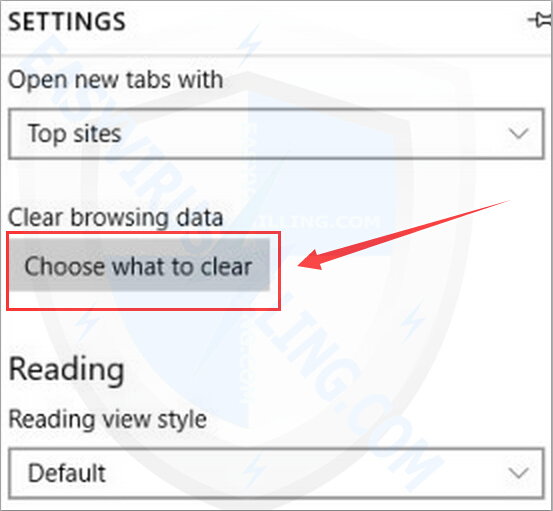
1. Select More (…) on the address bar, then Settings:
2. click “Choose what to clear”:
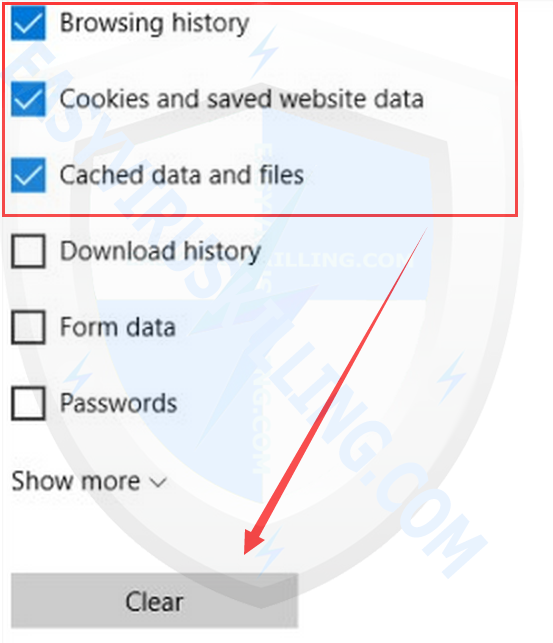
3. Check the first three options and then click Clear:
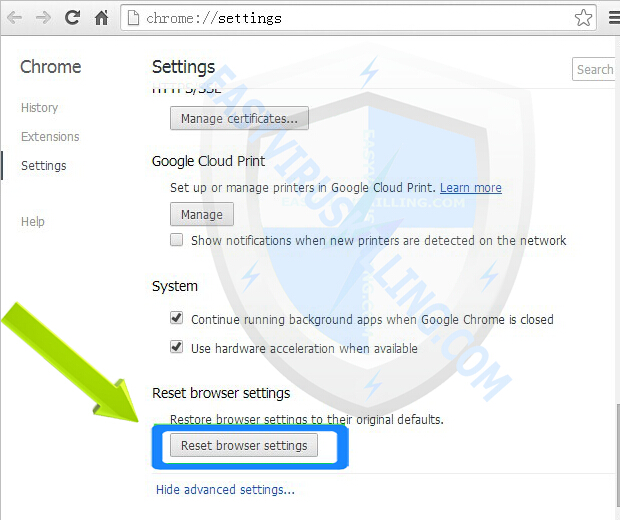
– Reset Chrome
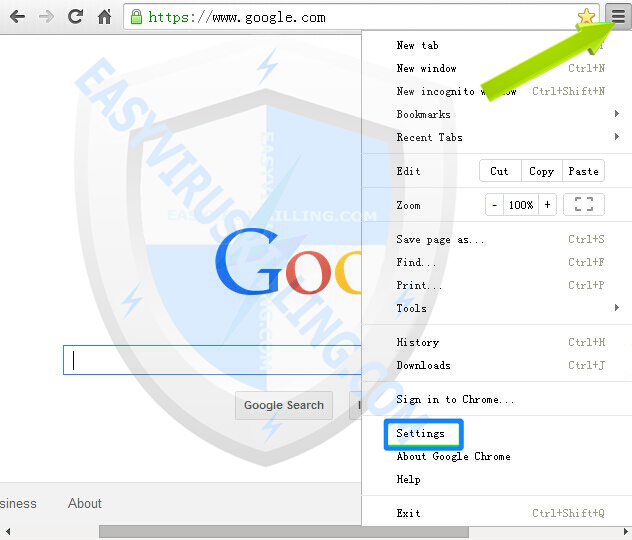
1. Open Chrome, then click “Customize and control Google Chrome” button, and then click on Settings
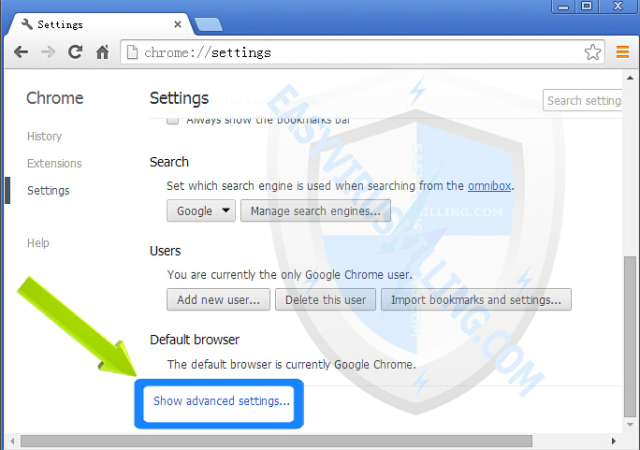
2. Under the Chrome Settings page, scroll down to the bottom, then click on Show advanced settings button
3. After clicking on Show advanced settings button, scroll down to the bottom and click on Reset browser settings button
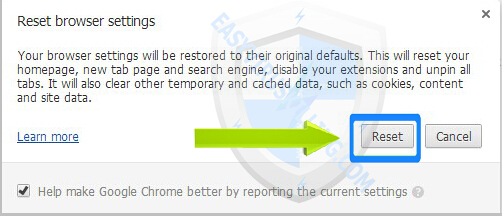
4. A message box will pop up to inform that your browser settings will be restored to their original defaults, click Reset button when it appears:
————————————————————————————————————————————————————————————————————–
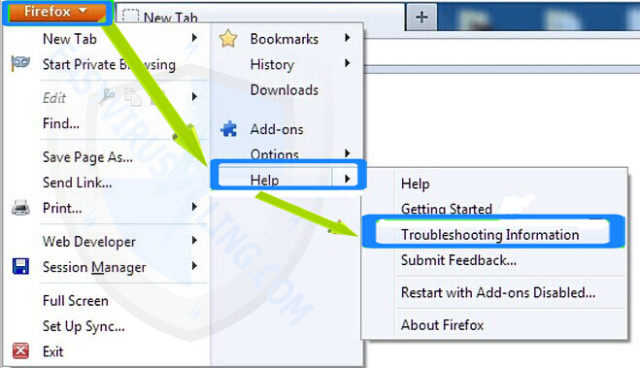
– Reset Firefox
1. Open Firefox, then click on Firefox button, then Click on Help button, then Click on Troubleshooting Information
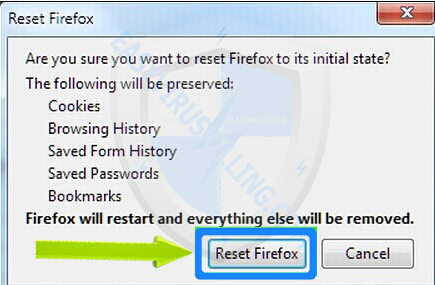
2. At the Troubleshooting Information page, click on Reset Firefox
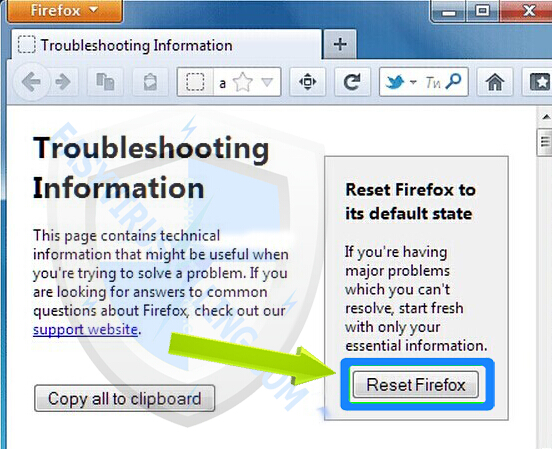
3. A message box will pop up to let you confirm that you want to reset Firefox to its initial state, click Reset Firefox button when it appears:
————————————————————————————————————————————————————————————————————–
– Reset Internet Explorer
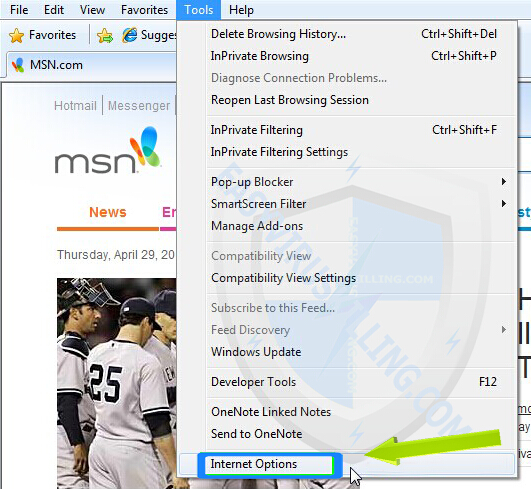
1. Open Internet Explorer, then click on Tools, then click on Internet Options
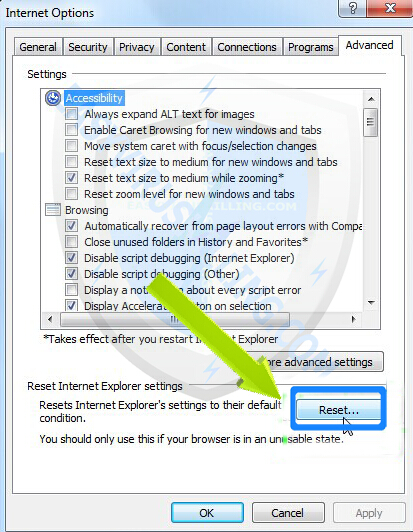
2. On the Internet Options window: click on Advanced tab, then click Reset button
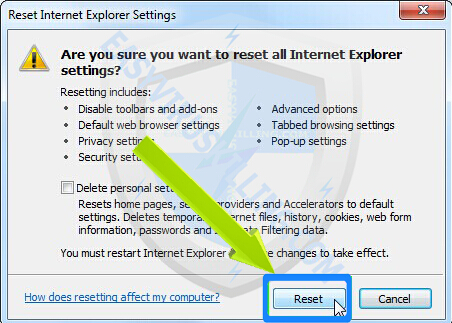
3. A message box will pop up to let you confirm that you want to reset all Internet Explorer Settings, click Reset button when it appears:
4. When the resetting process is done, you’ll see this message box, click Close
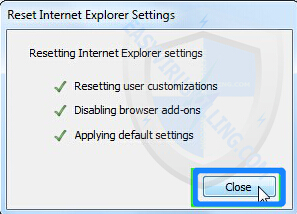
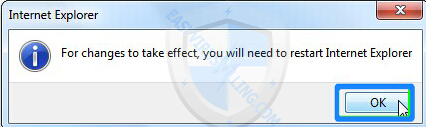
5. You’ll need to restart your Internet Explorer to complete the resetting process.
Part Two (Mac OS) – Remove Uncheckit Step by Step
It’s quite difficult and risky for common users to remove Uncheckits from Mac OS manually, therefore our tech team recommend all Mac users remove the infection safely counting on the most powerful Mac security tool – MacBooster Lite, which is a one-stop Mac and protection maintenance tool to remove Mac malware, clean up junks, and boost Mac performance. With greatly expanded virus and malware database, MacBooster 3 is the best anti-malware to keep your Mac away from virus, phishing attacks, spyware, malware, and all kinds of online threats while feeling safe about your personal data. Futhermore, it is able to speed up your Mac maximizely and make your machine run as a new one. Do not hesitate, download and install MacBooster Lite to remove Uncheckit and enjoy the best performance now:
1. Click the “Free Download” button below to download MacBooster 3 Lite, and run the file to completely the installation:
2. Once installed, click the System Status tab and click “Scan” to diagnose your Mac, and then click “Fix” button to solve all detected problems.
(You can also navigate to “Malware Removal” tab directly and scan and remove all Uncheckit related infecions)
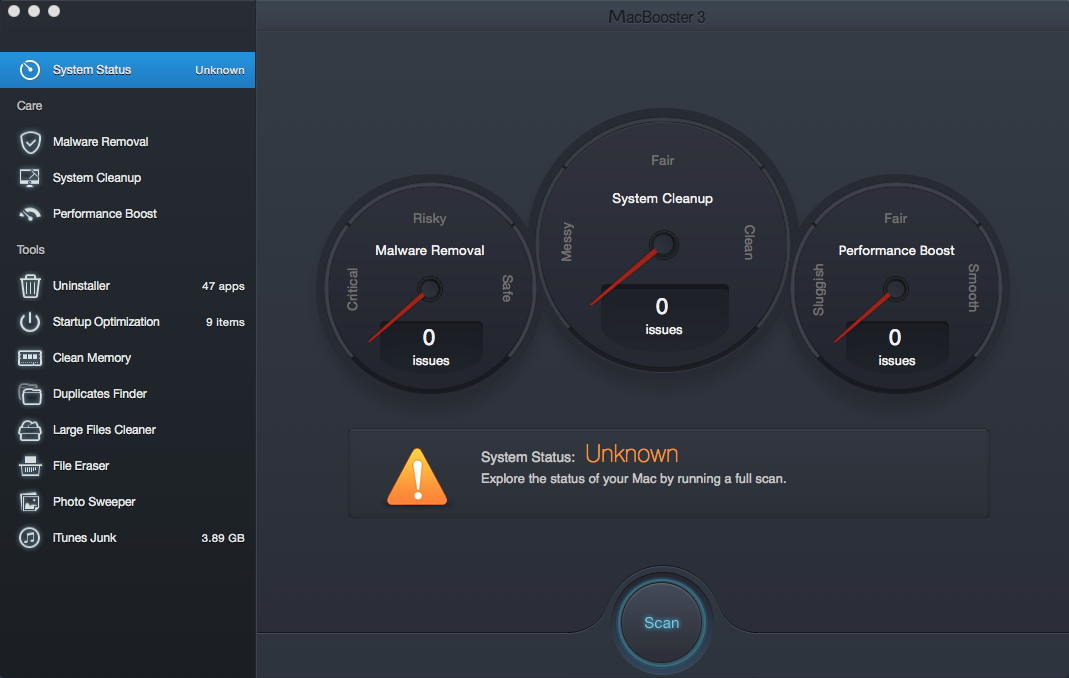
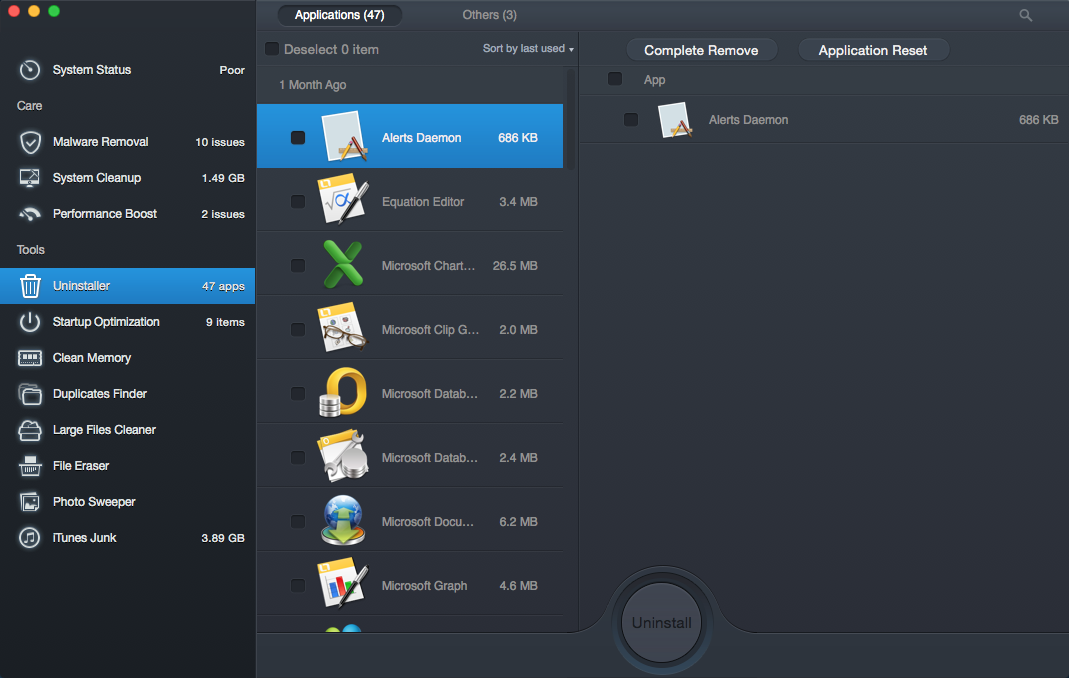
3. If the Uncheckit problem still exists, click the Uninstaller tab, and then find and uninstall suspicious and unwanted apps.
How MacBooster Liter Benefits Your Mac:
Security Center – Protect your Mac against various threats including Adware, Spyware, Malware, Trojan, Worm, Ransomware and Hijacker.
Performance Boost – Quickly cleans caches files generated by 3rd party apps and releases occupied RAM to fix such issue. It also drives your Mac to peak performance by fixing Mac disk permission issues
Uninstaller – Uninstall all unwanted apps. MacBooster 3 will accurately find every app application folder on your Mac and the hidden parts of them, and then uninstall them with no leftovers.
Duplicate Finder – Quickly track down duplicate copies on your Mac. MacBooster 3 sniffs out a list of matching duplicates for you and offers you an option to remove them so that your precious hard drive space can be further maximized.
Large Files Cleaner – MacBooster 3 can find large files that you don’t need any more and delete them to save you more space.
Friendly Reminder
If you can finish all the steps exactly, you must have got rid of the nasty Uncheckit virus as other PC users. Now you should learn some basic knowledge so that you will get viruses easily in the future . Please keep in mind, PC viruses are mainly disseminated through free software, emails, and porn websites, be carefully if you have any operations related with these things. First, always use Advanced or Custom Install while installing free software; secondly, do not click links or open attachments on emails unless you are sure that it is safe; thirdly, do not visit porn sites if you cannot assure its